How to Delete Photos From OneDrive

You can easily store and access your photos by syncing them with OneDrive for long-term storage. Though you can increase your OneDrive storage quota, the default 5GB of space should suffice to store a large set of photos. If you do run out of storage, you can always delete photos from OneDrive to make up room for some more.

You can choose to either delete individual or multiple photos at a time from your OneDrive account. This post is your definitive guide to learning how to delete photos from OneDrive on mobile and desktop.
Delete Photos From OneDrive on Mobile
OneDrive can sync with your mobile’s gallery or camera roll and store your photos. For Samsung Galaxy phone users, OneDrive is the default option for storing photos and videos. Let us first start by showing you the steps to delete photos from your OneDrive on your iPhone or Android phone.
Step 1: Open the OneDrive app on your iPhone or Android phone.
Step 2: Go to the folder that contains your photos. Then, long press on the photo that you want to remove.
Step 3: On iPhone, tap the three dots in the top-right corner and select Delete.


On Android, tap the Delete icon at the top-right corner.

Step 4: Tap on Delete again to confirm.

You can repeat the steps to select and delete multiple photos from your OneDrive.
Bulk Delete Photos From OneDrive on Mobile
You can choose to fasten the process and bulk delete images from your OneDrive storage.
Step 1: Open OneDrive and select the Photos tab at the bottom.

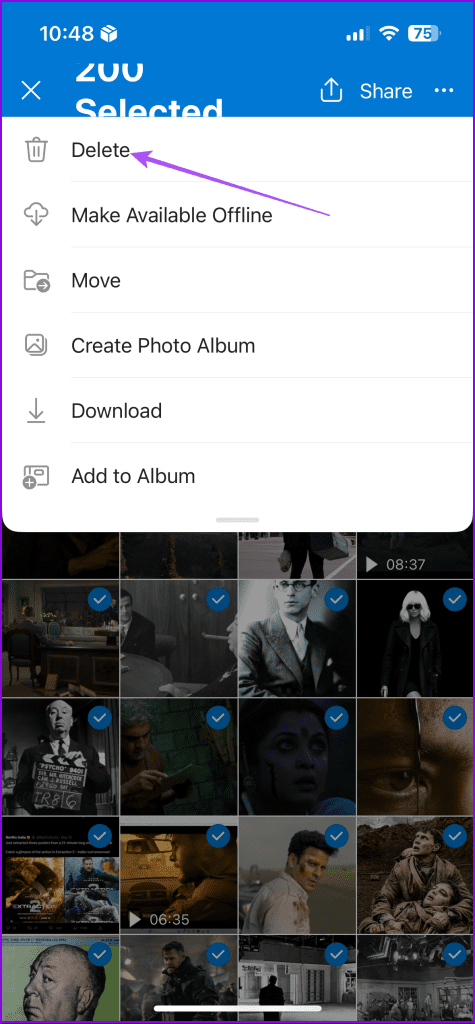
Step 2: On iPhone, tap on Select and then tap on the month name to select all photos clicked during that month.

On Android, long-press on a photo and swipe your fingers to select a lot of photos quickly.
Step 3: On iPhone, tap the three dots in the top-right corner and select Delete.


On Android, tap the Delete icon.

Step 4: Tap on Delete again to confirm.

Delete Photos From OneDrive But Keep Them on Phone
What if you want to remove photos from OneDrive but not from your phone? It is possible; you just need to unlink your OneDrive account from your gallery. Here’s how.
On iPhone
Step 1: Open OneDrive and tap on your profile icon at the top-left corner.

Step 2: Tap on Settings from the left menu.

Step 3: Select Camera Upload and disable syncing to your OneDrive account.


You can now go back to your photos in OneDrive and delete them. They won’t be removed from your iPhone.
On Android
Step 1: Open OneDrive and tap the profile tab at the bottom-right corner.

Step 2: Tap on Settings and select Camera Backup.


Step 3: Select ‘Turn Off Back Up’ and confirm your selection.

You can now go back to your photos in OneDrive and delete them. They won’t be removed from your Android phone.
You can also refer to our post if the OneDrive app is not syncing on your iPhone or Android phone.
Delete Photos From OneDrive on Desktop
The OneDrive app is also available for Mac and Windows PC users. The dedicated desktop app makes it easy to sync your photos on the cloud. Let us show you how to delete photos from the OneDrive app on your Mac or Windows PC.
On Mac
Step 1: Open Finder and click on OneDrive from the left menu.

Step 2: Select the photos that you wish to delete and press Delete.
To bulk delete photos, just press Command + A to select all photos and press Delete.
You can then empty the bin on your Mac to delete those photos permanently.

On Windows
Step 1: Open OneDrive and choose the folder that contains your photos.

Step 2: Press Command + A to select all photos or select individual photos. Then, press Shift + Delete to delete permanently.
How to Delete Duplicate Files From OneDrive
Sometimes, you might end up saving the same files more than once on your OneDrive. This ends up eating more storage on your OneDrive account. However, the process of deleting duplicates is easy. Just search for Copy in OneDrive on your mobile or PC, select all the duplicate files, and delete them.
Manage Your Photos
You can always come back to these steps to delete photos from your OneDrive account. You can also choose to share your photos with other users via OneDrive, just like how would do in Google Drive. Refer to our post to learn the steps to manage and share file access on OneDrive.
Thanks for your feedback!


