
One of the beauties of using a file-sharing service like Dropbox is that it allows you to share specific files and folders with others securely and privately. This is made possible by sharing permissions allowing you complete control every step of the way. But how does Dropbox sharing permissions exactly work? That’s what we will cover in this guide.

In this guide, you will learn how to share files and folders and how to restrict others from making unwanted changes or sharing with unauthorized users. So grab a coffee and relax.
Let’s begin.
How to Share Files in Dropbox
Let us first understand the sharing process. How to locate the files you want to share and then share them.
Step 1: There is a search bar on the top-right corner that you can use to locate the file you want to share with someone quickly. If you know which folder to look into, double-click to enter the folder.

Step 2: Hover over the file you want to share and you will view some buttons on the right. Click on the Share button.

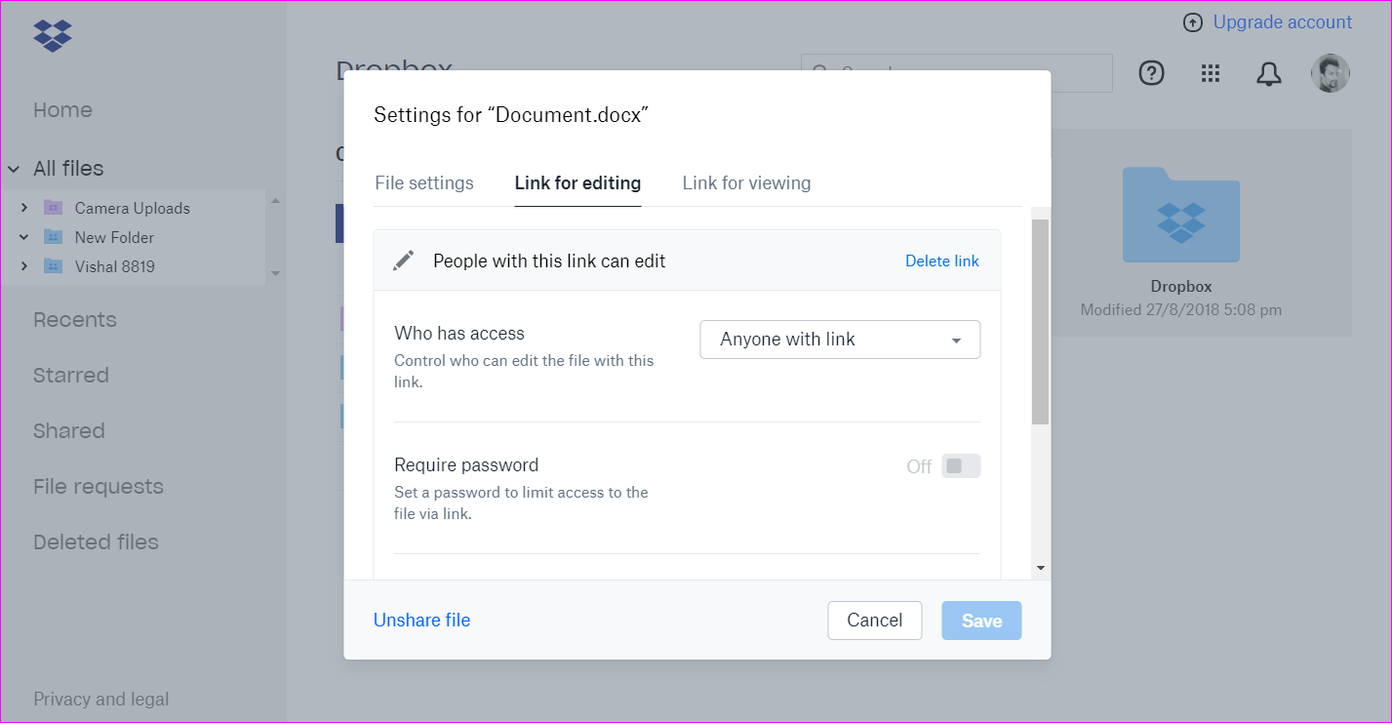
Step 3: That will reveal a pop-up menu with some settings and options. Enter the email ID of the people you did like to share the file with and click on the Share file button.

Step 4: By default, the person you are sharing the file with would be able to edit it. But you can quickly change that by selecting ‘can view’ from the drop-down menu next to ‘Anyone with this link’.

Step 5: Finally, instead of entering an email ID to send an invite, you also have the option to share a link to the file via social messaging apps. Click on ‘Create then copy link’ option to do that.

Step 6: Now, click on the Setting button.

Step 7: If you have created a link for sharing with just viewing permissions, select the Link for viewing tab. Here you can choose whether anyone with a link can access the file or only those whom you sent an invite to, set an expiry date post which link would no longer work, and disable downloads.

Step 8: If you have created a link for sharing with editing permissions, click on Link for editing tab, where you will find additional permission. You can set a password to further protect the file from unauthorized access and edits.

Users of Professional or Business plans also have the option to share files brand logo.
How to Delete Sharing Link or Unshare Files in Dropbox
If you no longer want to share the file with others or delete the link, that’s easy to do. Go back to the same menu as in the above point (file share menu) and click on Unshare file or Delete link under Link for editing.

Confirm the decision when asked.
How to Manage Permissions After Sharing Files in Dropbox
You have complete control even after a file has been shared either by invite or via link. Permissions can be updated or revoked at any time you choose.
Step 1: Click on the Share button next to the file you want to manage permissions of.

Step 2: Right below the name of the document in the pop-up menu, you will view the number of people who have access to the file. Click on that.

Step 3: Everyone who has access to the file will be listed here. Click on the drop-down menu next to the name to change the view or edit permissions or ‘Remove’ them or revoke access.

Step 4: Similarly, you can also change other settings like password, downloadability, and set expiry dates for the links.
How to Create and Share Folders in Dropbox
Just like files, you can also share folders in Dropbox. Again, you get a few different options to manage folders that we will discuss below, in addition to what we saw in file-sharing permissions above.
Step 1: You can either create a folder offline on your computer and add it to Dropbox or create one directly inside. Dropbox also allows you to create a Shared folder directly. Click on the Create button to find that option.

Step 2: A pop-up will reveal to ask whether you want to create and share a new folder or share an existing folder. Let’s create and share a new one. Click on Next.

Step 3: Name the folder, add email IDs of people you want to add to the folder, add notes if any, and set folder permissions like ‘can view’ or ‘can edit’.

Step 4: Now, when you go back to Share menu of the folder, you can choose who can add new members to the shared folder under Settings > Folder settings. Only owner or someone who has been added to the folder.

Permissioned Access
If you want to give access to a file or folder to someone, but don’t want him/her to make changes or edit the file, share a link to the file or invite via email with ‘can view’ option selected. Set a password so that only those who have the password can access the file. And finally, set a date after which the link will expire if you want a set-and-forget shareable link.
Dropbox offers plenty of ways to share files and folders with others, giving you, the owner, complete control over permissions. So you are in full control. But Dropbox is not the only cloud storage service provider. Google Drive offers an equally good experience should you be interested.


